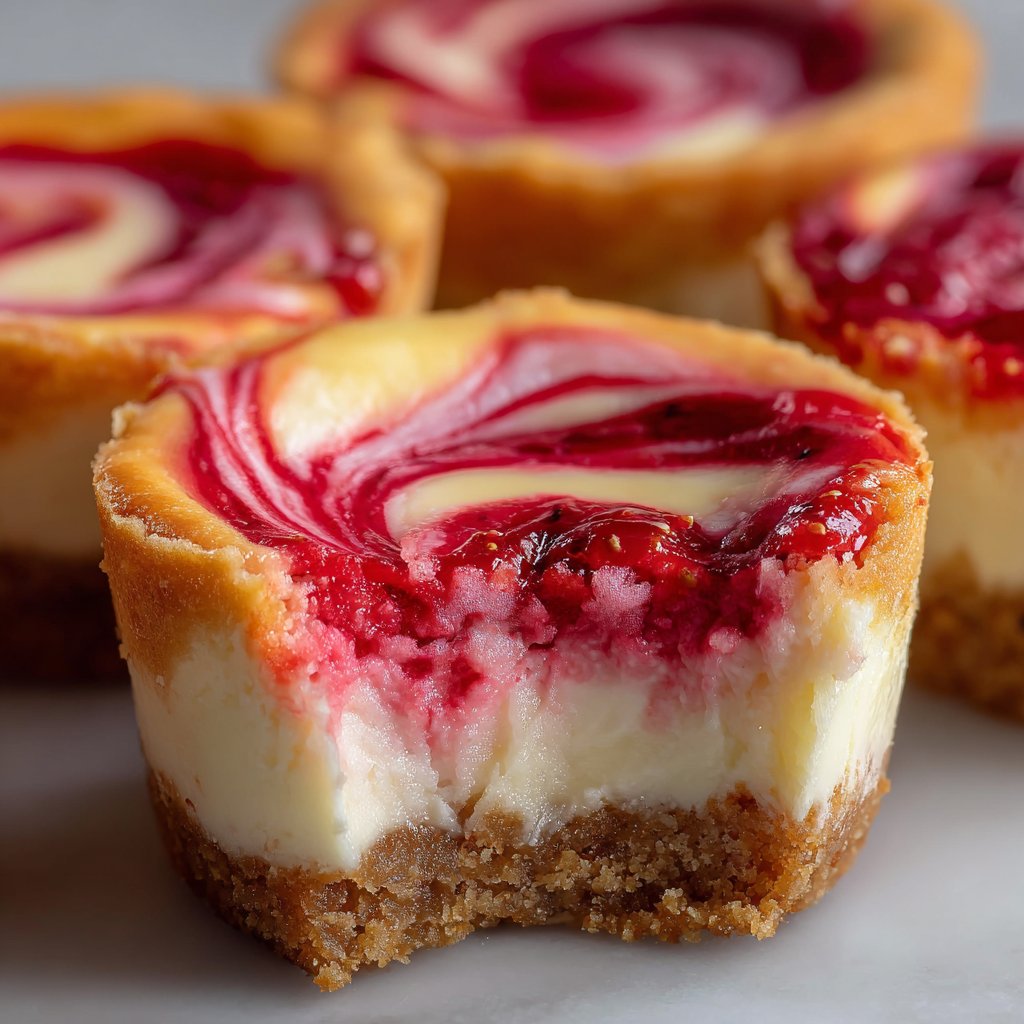
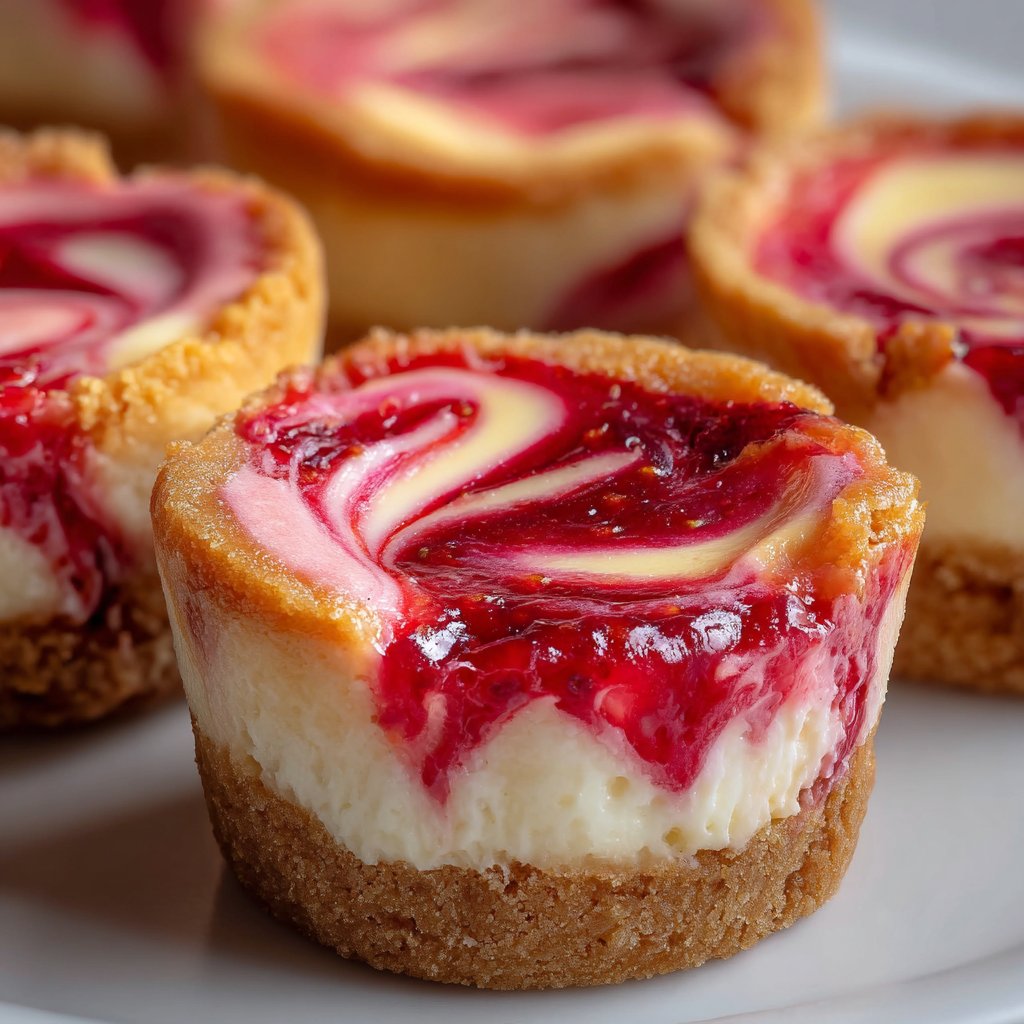
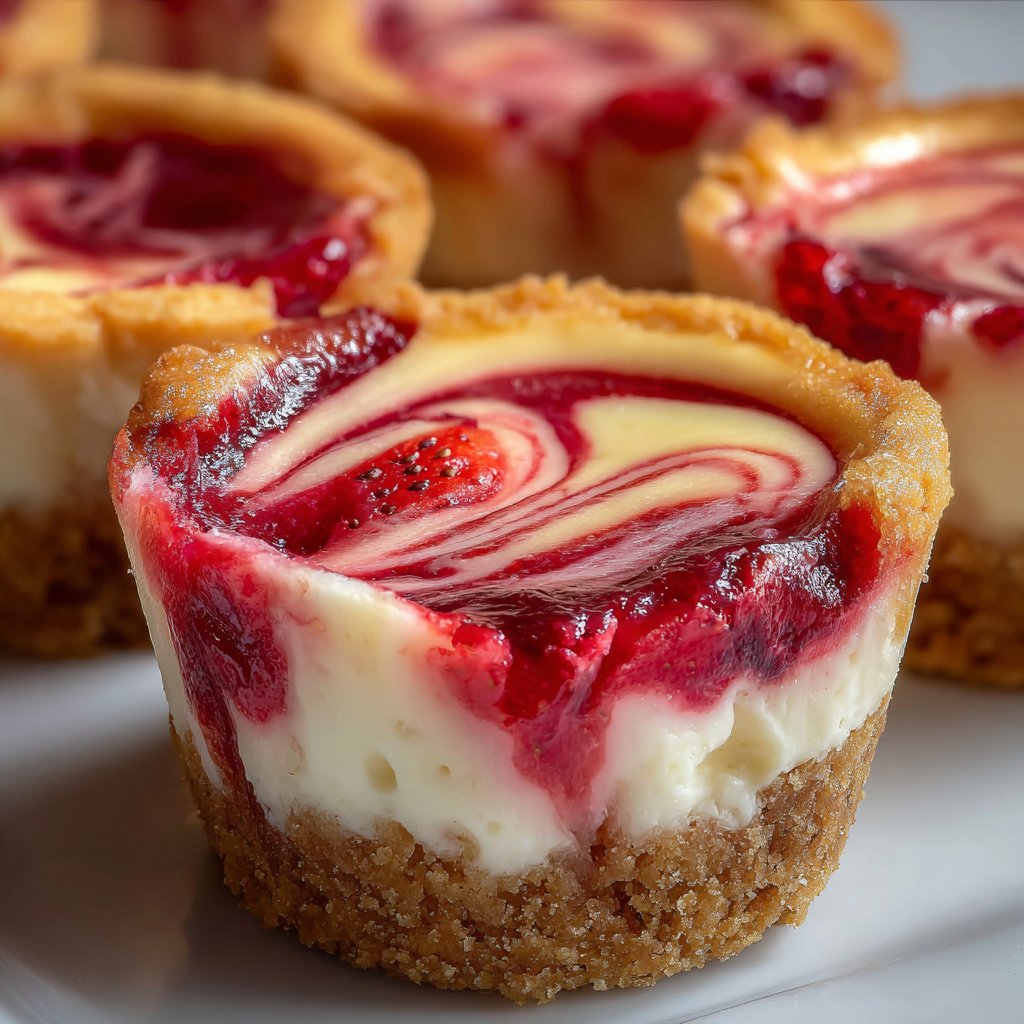
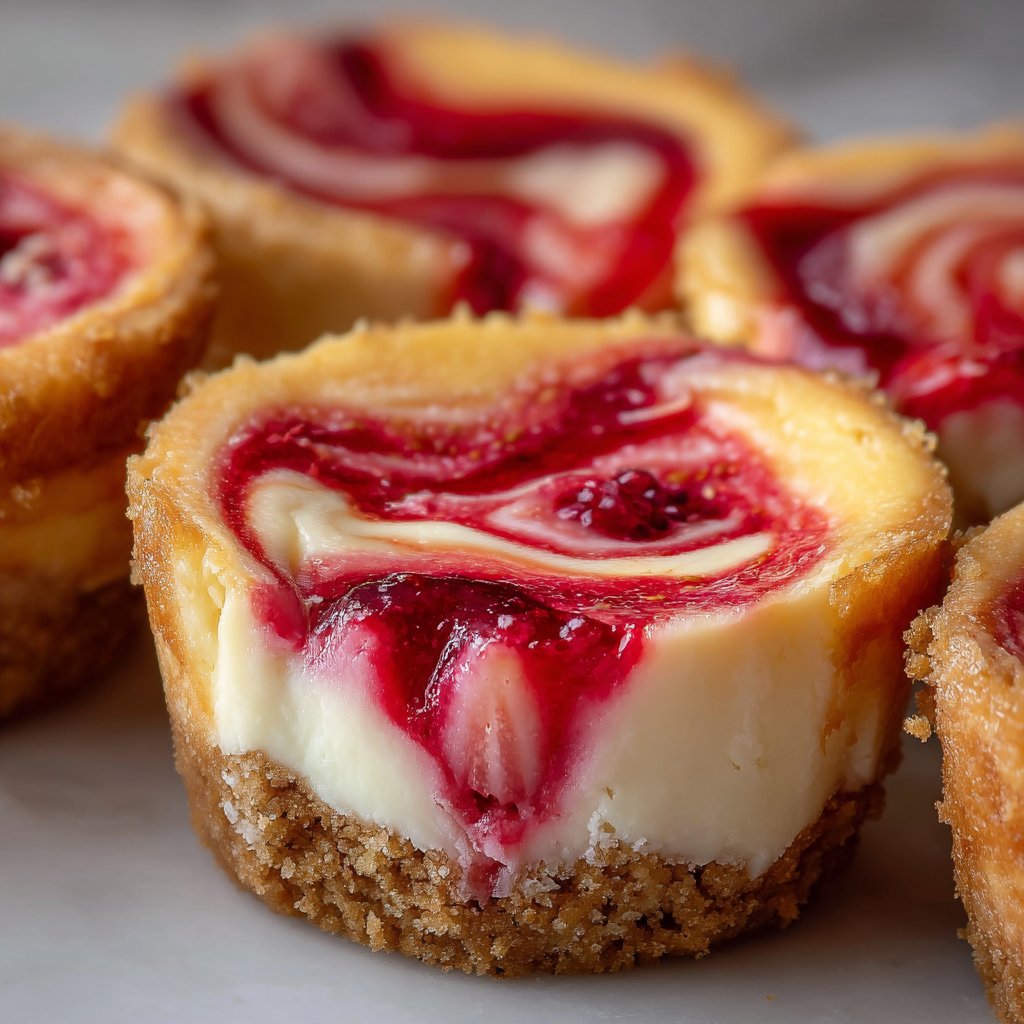
Strawberry Swirl Cheesecake Cookie Cups
Okay, friends, gather round! Let me tell you about these Strawberry Swirl Cheesecake Cookie Cups. They are, hands down, one of my absolute favorite things to whip up when I want something impressive looking but don’t want to spend six hours in the kitchen. I actually first stumbled onto the idea when I had leftover cookie dough *and* some cream cheese form another project (a cheesecake that, well, let’s just say didn’t quite go according to plan and ended up in a bowl with a spoon, haha) and thought, why not mush them together? Best impulse decision ever! It’s like the perfect little bite, you get that chewy cookie, the creamy cheesecake filling, and that bright pop of strawberry swirl. Seriously, they’re just little cups of happy.
Why These Little Guys Are My Go To
Honestly? Because they are SO dang easy, considering how fancy they look. I make this when I’m hosting a casual get together, or when I need a bring-a-plate dessert that I know everyone will love. (My kids go absolutely bonkers for them, which is always a win). They transport pretty well too, unlike a whole big cheesecake which can be a balancing act sometimes, right? Plus, they’re already portioned out, which is great… or terrible, depending on your self control level. Mine’s pretty low around these, gotta admit!
Bits and Bobs You’ll Need (Ingredients)
Here’s what you’ll need to grab form your pantry and fridge. Don’t stress too much about perfection here!
- For the cookie base:
- 1 tube (about 16 oz) refrigerated sugar cookie dough. Look, I know making cookie dough form scratch is lovely and all, but the pre made stuff works PERFECTLY here and saves you a ton of time. Promise! If you *really* want to make your own, this simple recipe is a good starting point.
- For the cheesecake filling:
- 1 block (8 oz) cream cheese, softened. Seriously, make sure it’s soft! Like, left out on the counter for an hour or two soft. It makes mixing so much easier.
- 1/4 cup granulated sugar.
- 1 large egg.
- 1/2 teaspoon vanilla extract. Use the good stuff if you have it, I like Nielsen Massey, but whatever’s in your cupboard is fine!
- A pinch of salt. Just a tiny bit helps balance the sweetness.
- For the strawberry swirl:
- 1/2 cup strawberry jam or preserves. You can use store bought or homemade. Honestly, any berry jam works here if you aren’t a strawberry person, raspberry is yummy too.
- 1 tablespoon water (maybe a tiny bit more if needed).
Let’s Get Baking! (Directions)
Okay, deep breaths. We can do this. It’s easier than it looks!
- Prep your pan. Preheat your oven to 350°F (175°C). Grab a muffin tin (a standard 12 cup one is best). You *can* grease it, but I honestly find that if your tin is nonstick and you’re using store bought dough, they usually pop out okay. Paper liners? I don’t bother, you lose the nice cookie edge shape, y’know?
- Cookie time! Divide the sugar cookie dough into 12 equal pieces. I usually just eyeball it, or you could slice the log if it’s that kind of dough. Roll each piece into a ball and place one in the bottom of each muffin cup.
- Make the cups. This is the fun part! Use a small glass or even your thumb (I use my thumb, feels more hands on!) to press the cookie dough ball into the bottom and up the sides of each muffin cup, forming a little cup or shell. Try to make the bottom fairly flat so there’s room for the filling. Don’t worry if it’s not perfect; mine never are!
- Partial bake. Pop the muffin tin into the preheated oven and bake for about 8 10 minutes. The edges should be just starting to look set and maybe a tiny bit golden. We’re not fully baking them yet! Pull them out and let them cool in the tin for about 5 10 minutes while you make the filling. This helps the shells hold their shape.
- Cheesecake filling magic. While the cookie cups are cooling slightly, get your cream cheese into a medium bowl. Use an electric mixer (or a whisk and some serious arm power!) to beat it until it’s super smooth and creamy. Then, beat in the sugar until it’s combined. Add the egg, vanilla, and salt and beat until everything is just mixed. Don’t overmix! You don’t want to whip too much air into it.
- Make the swirl stuff. In a tiny saucepan or microwave safe bowl, heat the strawberry jam with the water. Stir it until it’s a bit more liquidy and smooth. You don’t want chunks for swirling. If it’s still too thick, add another tiny splash of water.
- Fill ‘er up! Spoon the cheesecake filling into the slightly baked cookie cups. Fill them about two thirds full, don’t go all the way to the top or they’ll overflow.
- Swirl away! Now for the pretty part. Spoon or dollop small amounts of the warmed strawberry mixture over the top of the cheesecake filling in each cup. Then, grab a toothpick or a skewer and gently swirl the strawberry into the cheesecake mixture. Make pretty patterns, or just random swirls, it all looks good!
- Bake again. Carefully put the muffin tin back into the oven. Bake for another 15 20 minutes, or until the cheesecake filling looks set (it shouldn’t look jiggly in the center anymore) and maybe slightly puffed up. The cookie edges should be golden brown now.
- Cooling time. This is important! Let them cool in the muffin tin on a wire rack for at least 20 30 minutes. They need this time to firm up. Then, carefully remove them form the tin and let them cool completely on the wire rack.
- Chill out. I know it’s tempting, but they are SO much better chilled. Pop them in the fridge for at least an hour, or even longer. This lets the cheesecake really set up nicely.
And that’s it! See? Not so bad, right?
Things I’ve Learned (Notes)
- Soft cream cheese is key. If it’s cold, your filling will be lumpy and nobody wants lumpy cheesecake.
- Don’t skip the first bake for the cookie cups. If you just put the filling straight into raw dough, the cookies won’t cook properly and you’ll have raw bottoms. I learned that the hard way, trust me.
- Don’t overfill! Seriously, they puff up.
- Chilling is mandatory for the texture to be right. Warm cheesecake filling in a cookie cup just isn’t the same vibe.
Mix it Up! (Variations)
I’ve played around with these a bit. You could use different jams for the swirl, like raspberry or blueberry. Or, skip the jam and swirl in a little bit of melted chocolate or even peanut butter (though the peanut butter one was… okay, not my favorite!). I once tried using chocolate chip cookie dough instead of sugar cookie, and it was just a bit too much going on; the sugar cookie really lets the cheesecake shine. Next time, maybe I’ll try a lemon curd swirl? Hmm…
Gear You’ll Need (Equipment)
- Standard 12 cup muffin tin. If you don’t have one, you could probably use jumbo muffin cups, just adjust the cookie dough amount and baking time.
- Mixing bowls (medium and small).
- Electric mixer (handheld or stand mixer) or a good whisk.
- Measuring cups and spoons.
- Small saucepan or microwave safe bowl for the jam.
- Toothpick or skewer for swirling.
- Wire cooling rack.
Keeping Them Fresh (Storage)
Store these in an airtight container in the fridge. They should keep for 3 4 days, but honestly, in my house it never lasts more than a day or two! You can probably freeze them too, though I’ve never had any leftover to test this theory properly.
How I Serve ‘Em (Serving Suggestions)
Straight form the fridge is best! They’re perfectly fine on their own, but sometimes I’ll add a little fresh strawberry slice on top, or a tiny dollop of whipped cream if I’m feeling fancy. My nephew likes a little sprinkle of graham cracker crumbs over the top to really lean into the cheesecake vibe.
Pro Tips (Lessons Learned)
Okay, pay attention, these are form mistakes I’ve made:
- Don’t skip softening the cream cheese. I tried using slightly cold cream cheese once and ended up with tiny lumps no matter how much I beat it. Annoying!
- Give those cookie cups enough time to cool slightly after the first bake before adding the filling. If they’re too hot, the filling can melt the cookie shape a bit.
- Be gentle when swirling! Don’t dig all the way to the bottom or you’ll mess up your cookie base. You’re just swirling the top layer.
- Letting them chill properly is non-negotiable for the best texture.
Burning Questions? (FAQ)
Got questions? I probably did too the first time!
Q: Can I use a different kind of cookie dough?
A: Yeah, you could try others! I prefer sugar cookie because it’s pretty neutral and lets the cheesecake and strawberry shine, but a plain shortbread dough would probably work too. Chocolate chip was just… a bit much.
Q: My cookie cups shrank! What happened?
A: Did you press the dough firmly enough up the sides? Sometimes if they aren’t pressed well or don’t get that initial partial bake, they can pull away form the sides a bit. Make sure the dough is solid in the cup before the first bake.
Q: The cheesecake filling cracked a little on top. Is that okay?
A: Totally fine! It happens, especially if your oven temperature is a little uneven or you baked them maybe a minute or two too long. Once they cool and chill, it’s usually not noticeable, especially with the swirl. Tastes just as good!
Q: Can I make these ahead of time?
A: Oh yes, absolutely! They are perfect for making the day before. They need that chill time anyway, and they hold up beautifully in the fridge.
Okay, go forth and bake! Let me know how they turn out!
Ingredients
- 1 (16.5 ounce) package refrigerated sugar cookie dough
- 8 ounces cream cheese, softened
- 1/4 cup granulated sugar
- 1 large egg
- 1 teaspoon vanilla extract
- 1 cup fresh strawberries, hulled and chopped
- 2 tablespoons granulated sugar (for strawberry swirl)
- 1 teaspoon lemon juice
Instructions
-
1Preheat oven to 350°F (175°C). Press cookie dough into the bottom and up the sides of a 12-cup muffin tin to form cups.
-
2In a medium bowl, beat softened cream cheese and 1/4 cup sugar until smooth. Beat in the egg and vanilla extract until just combined.
-
3In a small saucepan, combine chopped strawberries, 2 tablespoons sugar, and lemon juice. Cook over medium heat, stirring occasionally, until strawberries soften and release juice, about 5-7 minutes. Mash slightly with a fork if desired. Let cool slightly.
-
4Spoon the cream cheese mixture into the cookie cups, filling each about two-thirds full.
-
5Drop small spoonfuls of the cooled strawberry mixture over the cream cheese filling. Use a toothpick or knife to gently swirl the strawberry into the cheesecake.
-
6Bake for 15-18 minutes, or until the edges of the cookie cups are golden brown and the cheesecake filling is set. Let cool completely in the muffin tin before carefully removing. Chill in the refrigerator for at least 1 hour before serving.
Approximate Information for One Serving
Nutrition Disclaimers
Number of total servings shown is approximate. Actual number of servings will depend on your preferred portion sizes.
Nutritional values shown are general guidelines and reflect information for 1 serving using the ingredients listed, not including any optional ingredients. Actual macros may vary slightly depending on specific brands and types of ingredients used.
To determine the weight of one serving, prepare the recipe as instructed. Weigh the finished recipe, then divide the weight of the finished recipe (not including the weight of the container the food is in) by the desired number of servings. Result will be the weight of one serving.
Did you make this recipe?
Please consider Pinning it!!